Friday, 19 November 2010

Post 7: Additiional Pre-Production Documentation

Location Recce


Risk Assessments

Hazards

A fire in the building being used or in a building near by
- If there were to be a fire in the building then there are many exit's that are very accessible. By the stage there are 2, one by the stairs and one in the corridor, these would be the 2 closet exits. If these two were not available there is another two through the corridor and an extra 2 in the hall so there is a possible 6 exit's in total.
Falling of the stage
- to prevent anyone from falling of the stage we would be cautious by not allowing any one who doesn't need to be on the stage to be on the stage, this would minimise the risk of an accident accruing, also we would make sure the is enough lighting on stage for cast and crew to know were the stage starts and ends and would also not allow any 1 near the edge of the stage.
Tripping over equipment or props
- with any equipment we use we would not allow any loose leads to stay that way, all cables would be covered by either using a mat or masking tape, any props would be safely stored until we need to use them and therefore we would aim to make sure we had enough floor space for people to get around.

It is important for us to performe a risk assesment as we need to make sure that all individuals are safe to the best of our abilities.a risk assesment is there to help to provide safe and simple provitions in case of an emergancy.

Shooting Schedule

Day/Time
Description
20/10/10
1:25PM
Check the location and the crew are available, and then book out the camera.
21/10/10
2:25PM
Collect the camera equipment and write a team members name on the tape. Then start filming: Shoot scene 1, 2 and 3 from the front of the stage.
21/10/10
2:45PM
Continue filming: Shoot scene 2 and 3 from the left side of the stage to ensure editing can be seamless.
21/10/10
2:55PM
Continue filming: Shoot scene 4 with the camera facing ELLY.
21/10/10
2:05PM
Continue filming: Shoot scene 4 again with the camera facing KELLY.
21/10/10
2:15PM
Finish filming: Shoot scene 5 following the character out of the doors.
21/10/10
3:25PM
Return the cameras in the state in which it was received in.

Mise-en-scene description

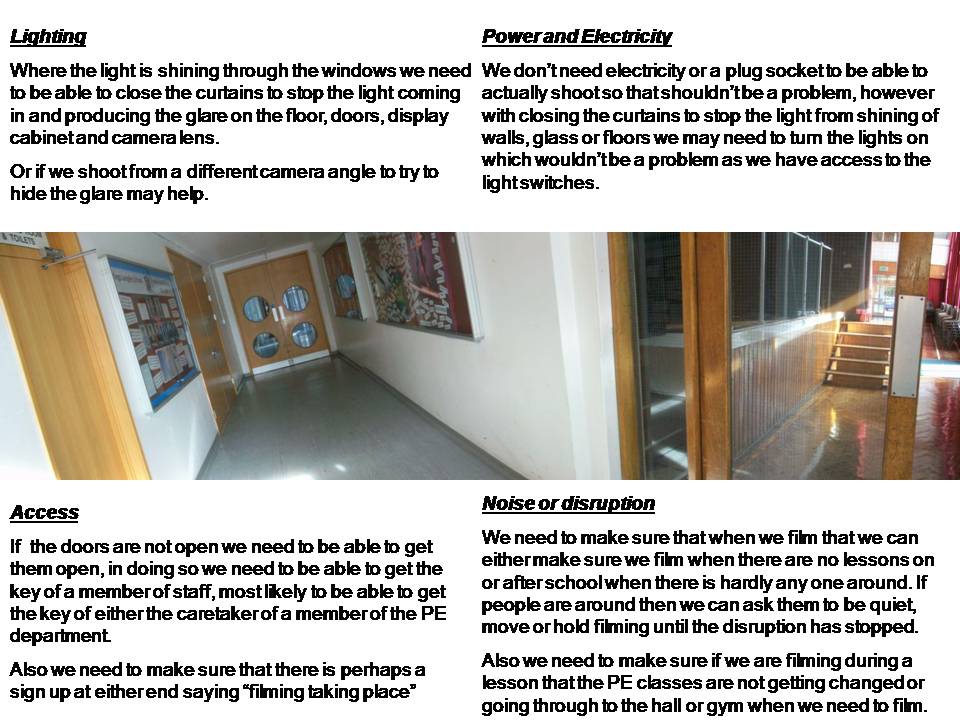
Location - The only 2 locations that we have as a group or individualls is in the hall on the stage and the corridor. As a group we need to make sure that we film when we know the hall and corridor is free.
Props - The only props we need are 2 chairs, these will be easy to look after and get hold of as we just nee to get them from the hall.
Lighting - We need to make sure that we have enough lighting so that all of our shot's can been seen and the picture isnt to dark, if the lighting is to dark we need to make sure that we are able to provide more light to make sure that the lighting is fine for use. also the other way around we need to make sure that if there is to much light that we are able to cover up the light in some way.
Charecter movement - at the start of shooting we have ELLY jogging off the stage and down the stairs, then she goes through the door to the corridor where her and KELLY will exchange dialogue, they then sit and exchange more dialogue, once they have finished ELLY and KELLY both get up, hug and ELLY and then ELLY runs out the door to the back of the cooridor.
Costume - For our costumes we didnt have any stricked guidlines as top what we wantd them to wear, we felt that if ELLY was able to wear what she liked it would make it more rilistic and more like the X-Factor.
Hair and Make up - hair and make up was the same as costumes, we didnt want to be strickd as we didnt make it look naturall.


Cast, Crew, Equipment and Props lists.

Cast - ELLY & KELLY
Crew - SHARNI, FAITH, ELLY & KELLY
Equipment - Still camera, vedio camera, tripod and tape
Props - 2 chairs, X-Factor sign's

Tuesday, 16 November 2010

Post 5: Jump Cuts, Over-the-Shoulder Shots, Cutaways and Point of View Shots

Jump Cut

Definition : A jump cut is a cut in film editing in which two sequential shots of the same subject are taken from camera positions that vary only slightly. This type of edit causes the subject of the shots to appear to "jump" position in a discontinuous way.

My Definition : When in editing, the two sequential shots are taken but the camera angle is slightly positioned different making the footage appear to have jumped.


Over-the-Shoulder-Shot

Definition : In film or video, an over the shoulder shot (also over shoulder, OS, OTS, or third-person shot) is a shot of someone or something taken over the shoulder of another person.

My Defintion : when filming, the camera is behind a character and slightly to one side, pointing and veiwing what the character is looking at, therefore it gives the effect that you are right behind them, feeling and getting the same emotions as they are getting.


Cut aways

Definition : A shot in which the camera view is reframed to give the audience information that was previously outside of the camera's view. Often used to reveal something.

My Definition : A shot that reveals the seroundings and whats going on out side of the camera's enital veiw, shows what's going on apart from what was shown in the first shot.

Point of view shot

Definition : A point of view shot (also known as POV shot or a subjective camera) is a short film scene that shows what a character (the subject) is looking at (represented through the camera).

My Definition : Ashot that establishes what the character is looking at, we see it through their eyes or where there eye's would be, we the veiwer are the actors and see what they do.

Monday, 8 November 2010

Post 6: Story board and Shot list

http://kellybrown-as-ms.blogspot.com/2010/10/post-6.html  - (This link provides you with both the story board and the shot list, i have had to use a link as the group were unable to send me the documents.)

Shot List

The shot list shows which order and how our scene's will be shot, it shows the different shots in each scene. It also tells you what the camera will be doing every step of the way, the movement of the camera ans the shot the camera will be taking. It shows the location in witch each scene will be used and where filming will take place and in witch order we will try to shoot.

Stroyboard

The storyboard shows how we plan to shoot our video, each section contains :-

> Scene number
> Scene shot number
> Int/Ext
> Character movement
> Camera movement
> A rough estimate of Length of shot

Each scene shot has a picture to represent what is hapening in that shot, weather they are having a convosation or if they are running away.

I did scene shoot 7, 8,+ 9 were as the other 3 team members did the other 6 between them.

Post 8: Production Report

Individual Production Report
Our filming process took around 60minuets, all of our process consisted of collecting the equipment (tri-pod, camera, tape), collecting our props (2 chairs), it also consisted of filming all of our scenes, re-filming scenes if we felt it could have been better, packing up and returning all equipment the way we were given it back to media.
I personally found the filming process fine, I thought that as a group we worked well to get all filming done in the time space we had, I don’t feel that we had any major issues when we were filming, I think that all team members contributed very good ideas witch I can only say made the filming time more fun, enjoyable and the end product better.
The filming itself I feel went well. When our actress Lalika had to go down the stair’s in the second scene, I feel she went at the right pace (speed), we did however re-film the shot 2 or 3 times just to make sure we had very good filming, to the best of our ability’s. Therefore we all knew that when Lalika went down the stairs, for continuity purposes, she would have had to go down each step with the same foot she had done previously, if the first step she took was with her right foot then she had to go down every time with the first step with her right foot. This just meant that our continuity was much better and much much smoother. Apart from that we didn’t have to many problems, the only other 2 problems I feel we had were, 1 – our actresses sometimes forgot there lines, but that wasn’t a problem, we just reminded them of the dialog and re-shot the scene, but lets face it, all actor’s/actresses’ forget there lines at some point. 2 – Miss Fisher had finished her P.E class and came through the corridor at the wrong time and started to speak, it wasn’t however an issue, she apologized and we just re-shot the scene, if any think I feel that the re-shot was better than the first shot.
I personally think that the filming made us work more as a team and made our work better as a result of that, I feel the whole project so far has been successful and the end product I think we be impressive.

When we watched the footage back i feel that it was good for unedited work, i feel that where different members put their idea's in for little changes it really helped, the footage even though it hasn't be edited look very good. I feel that i therefore have to congratulate every member of the team as all the preparation, all of the planning has paid off, there fore the evidence is there that planning and preparation has made our work much better. 


Changes

Problem - When we were looking back through the footage for a second time, we as a group realised that when we were doing the 'shot - reverse - shot', we had filmed with the camera to high, it was not at eye level witch meant that when (being the viewer) watching it, we didn't feel the connection of the conversation. We wanted the viewer to feel as if they are part of the conversation.

How to solve the problem - We will need to re-shot that part of the filming, when we are re-filming we will need to make sure that we have the camera at eye level to the actresses in the conversation, this way we will make the viewer feel like they have more connection to what is happening.

What will we need to think of when re-filming - when we re-shot we will need to think of what we are doing so we don't have thew same problem again, this means, double checking that the camera is at eye level so that when we go to watch it again we feel more of a connection to the action/conversation taking place.


Re-shooting

I feel that re-shooting went very well, we got all the shooting done in less time than we did the first time and we shoot more times to make sure that we had the right footage than the first time as well.

As a team i felt we worked even better with each other, i feel that our team work improved dramatically because we were all really focused on our goal of getting all filming in on time. as a result of that we didn't rush as we didn't want to have to re-due the filming for a 3rd time but we focus on getting all details in that there is no room for era.

After Re-shooting

i feel that the re-shooting was a success. looking back over the footage it does seem better than the first attempt. i can now see from watching the second load of filming that it is better. watching the second lot of shooting as a viewer i do feel like I'm more in depth with the conversation, were as at first i didn't feel like that was the case.


Friday, 22 October 2010

Post 4: Script Writing


Potential Issues

With shooting these scene's there are a few potential issues that may happen from scene to scene. For example if we didn't have enough time to shoot the whole video in 1 lesson or even in the same day we would need the actors to make sure they wear the same cloths as the wore on the first part pf shooting, wear their hear in the same way, have the same make-up on and same footwear, if all these are the same it will make continuity much better.

Another potential issue we have is if we were to loose props, if for example there in music gear on the stage then when we came back to shooting it had be moved to a different position or it had been taken completely, then the viewers would notice it making our film bad to watch, the continuity would be bad and we would loose marks.


Tuesday, 12 October 2010

Post 3: Continuity


This picture shows how to draw movement when drawing your story board, if you draw an arrow on the inside of the box then you are showing your character's movement, however if you are to draw you arrow on the outside of the box then you are showing the movement of your camera.
If you want to show movement of the character then draw your character near the start of movement other wise your character would be running out of shoot.


Continuity

The definition of continuity i found was on http://www.wordiq.com/definition/Continuity.

Continuity is when in terms of media every shot should be continuous and accurate, it should be smooth and fluent. For example if in a scene in one shot a man has a beard wearing a scarf and in the next shot when the camera angle moves he doesn't have a beard or the scarf, it straight away shows bad continuity, as the viewer you will know that it cant be realistic.

This schematic shows the axis between two characters and the 180°
arc on which cameras may be positioned (green). When cutting from the
green arc to the red arc, the characters switch places on the screen.

180* Rule / Crossing the Line


The 180° rule is a basic guideline in film making that states that two characters (or other elements) in the same scene should always have the same left/right relationship to each other. If the camera passes over the imaginary axis connecting the two subjects, it is called crossing the line. The new shot, from the opposite side, is known as a reverse angle.


Shot Reverse Shot
Shot reverse shot is a film technique where one character is shown looking at another character (often off-screen), and then the other character is shown looking back at the first character. Since the characters are shown facing in opposite directions, the viewer assumes that they are looking at each other


(http://en.wikipedia.org/wiki/Shot_reverse_shot)


 Match On Action

Connects two shots cut together by having a character finish an action in the second shot begun in the first shot. For instance, if a character lights a match in the first shot, the same character will draw it up to a cigarette in the second.

(http://www.google.co.uk/search?hl=en&safe=active&defl=en&q=define:match+on+action&sa=X&ei=Z0O8TOzjN4-RjAecm9GqDg&ved=0CAYQkAE)


Thursday, 7 October 2010

Post 2: Storyboard Drawing, Shot Sizes and Framing

Shot Size's

- In box no.1 i have drawn a shot size of an extreme close up. (ECU)

- In box no.2 i have drawn a shot size of a close up (CU)

- In box no.3 i have drawn a shot size of a Medium close up (MCU)

- In box no.4 i have drawn a shot size of a medium shot (MS)

- In box no.5 i have drawn a shot size of a 3/4 shot

- In box no.6 i have drawn a shot size of a medium long shot (MSL)

- In box no.7 i have drawn a shot size of a long shot (LS)

- No.8 its talking briefly about an establishing shot, this shot is often an aerial shot that establishes the location


We had to use a still digital camera to take photographs to represent the shot sizes we had previously illustrated.


This photo we had taken was of an extreme close up (ECU), meaning we cut of a little bit of the hear at the top and bottom.


This photo we had taken was of a close up (CU), no head room but you can see a little bit of the shoulders.


This photo we have taken is a medium close up (MCU), with head room and you can also see a horizon line.


This photo we have taken is of a medium shot (MS), there is head room, a horizon line and some back ground.


This photo that we have taken is a 3/4 shot, there is more head room, you can still see the horizon line and there is more background, also now you can start to see the path behind.


This photo we have taken is a medium long shot (MSL). there's more head room, more background, more path showing and you can still see the horizon line, but this time there is no walking space. 


This photo we have taken is a long shot, there is still a horizon line, more background more head room and more walking space and lots more of the path showing.

This photo that i have taken shows an established shot, this shot shows the location.
 
Rule Of Third's

This link explains and shows you the Rule Of Thirds using text and imitation.


This photo now abides by the 'rule of thirds' rule, it abides by the following :
  • The eyes are roughly about 1/3 of the way down
  • The ice cream is ruffly about 1/3 of the way across from the right hand side of the picture
  • The wall in the background is ruffly about 1/3 of the way up.


Tuesday, 21 September 2010

Post 1: Preliminary Task Introduction

To film and edit a charector opening a door to then croos the room and sit down on a chair. When they sit down they will be sitting down opposite another charector and they will then together exchange a few lines of dialogue. This task should demonstrate match on action, shot/reverse shot and the 180-degree rule.